Module 2. Setting Up Neo4j Aura
Course 4. Building Graphs in Neo4j
Estimated Time: 30 minutes
🧭 Module Objectives
- Create a free Neo4j Aura account.
- Launch and connect to your first Aura instance.
- Understand the difference between your project, database, and browser.
- Successfully log into the Neo4j Browser, where you'll build and explore your first graph.
What Is Neo4j Aura?
Neo4j Aura is the easiest way to start using Neo4j. It is a fully managed, cloud-based graph database service that runs in your browser. You don't have to install or configure anything. Neo4j maintains the servers, handles security, and manages updates. You just focus on building and exploring graphs.
Aura comes in several editions (Free, Professional, Enterprise), but the Free tier is perfect for our course. It gives you:
- One instance (which you can use for several projects)
- Enough storage for small to medium-sized graphs
- A built-in browser interface
- Instant access: no downloads or admin setup
Think of Aura as your online graph notebook, always available and always saved (as long as it hasn't gone inactive for 30+ days!).
Creating Your Free Account
Follow these steps carefully. You can complete them in less than 10 minutes.
Step-by-Step
Follow these steps to create your account and get your first Neo4J Aura instance up and running. If you struggle with the steps, be sure to check out the short video at the bottom of this section, which demonstrates a full run through each of these steps. Please note that the Aura interface and precise steps may change over time and that these steps—and the videos below—reflect the interface and process on November 5th, 2025. If these change, we will update this module as soon as possible.
- Go to https://neo4j.com/cloud/aura/
- Click "Start Free"
- You can create a new Aura-specific account using an email address. OR sign-in using an account that you may already have on Google, Github, or Microsoft.
- Verify your email (if prompted)
- You'll receive a confirmation code or link in your inbox.
- If you receive a confirmation code, enter this to verify your identity.
- If you receive a confirmation link, click it to activate your account.
- Finish Account Creation (if prompted)
- If you've created a new account using your email, you'll be asked to set a password. A good practice is to use a "secure" password uniquely generated and stored by a password manager, often built into modern web browsers.
- Complete Onboarding
- You'll be asked to answer a few questions, including your name.
- If you're asked something like "what are you looking to achieve with Neo4j?" select the most appropriate response, which might be "just exploring for a personal or student project."
- If you're asked something like "what best describes your role?" select the most appropriate response, which might be "student."
- If you're asked something like "what is your use case?" select the most appropriate response. In our case, "knowledge graph" is the best option.
- Create Your "Instance" and Save your "Credentials"
- At the end of the onboarding process you are offered the opportunity to create a free "instance" (this is the running version of Neo4j Aura that is assigned to your account). A significant limitation of the free instance is that they are DELETED after 30 days of inactivity and you cannot restore/recover any data once the instance is deleted. Other limitations include:
- You can create up to 200,000 Nodes and 400,000 Relationships. This is quite generous and should be sufficient for most student/personal projects.
- Data in free instances are not automatically backed up. You can manually execute a snapshot and you can only download/restore from the most recent snapshot.
- To proceed, click "create instance." It may take a few minutes for this to complete (things are being setup on the server).
- As you wait for the instance to be created, save the admin credentials that are auto-generated for the instance you are creating. This includes the username "neo4j" and a generated password. You can download this as a text file, which you should save in a secure and logical location so that you can easily find it when necessary. ⚠️ If you lose the password, you can reset it later, but it's best to store it now.
- Note that these "admin credentials" are separate from your Neo4j Aura username and password, so don't confuse them!
- A Neo4j Aura user may have multiple "instances." They will have a username and password that they use to access their Aura account and each instance will have its own separate admin credentials.
- There is an interesting short video available on the instance creation page, and this is worth watching as you wait.
- Once the server has completed creating your instance, you will be automatically taken to the Neo4j Aura Console and should see that your new free instance is "running."
- At the end of the onboarding process you are offered the opportunity to create a free "instance" (this is the running version of Neo4j Aura that is assigned to your account). A significant limitation of the free instance is that they are DELETED after 30 days of inactivity and you cannot restore/recover any data once the instance is deleted. Other limitations include:
Here's a video walk-through of all the steps outlined in this section so far:
Video walk-through (November 5, 2025) of the steps outlined above.
Opening Your Instance in the Aura Console
Now that your instance is running, you're ready to explore the Aura Console's visual interface. Here are the basic steps:
- From the Aura console, click the "Connect" button next to your new instance and choose "Query."
- This opens the Query Tool, showing your instance, which should have zero nodes and zero relationships.
- If prompted, log in using:
- Username:
neo4j - Password: (the one you saved earlier)
- Username:
The following video provides an example of the steps outlined in this section, and what you should expect to see in the Aura Console's Query Tool:
Connecting to your new Neo4j Aura instance for the first time.
That's it. You're in! 🎉
Understanding the Interface
Before we dive into building graphs, let's briefly understand what you're looking at. The Aura console is packed with features and this can be confusing and, perhaps, intimidating. Neo4j's Aura Documentation provides the most comprehensive overview, but here's a short summary of the key interface areas:
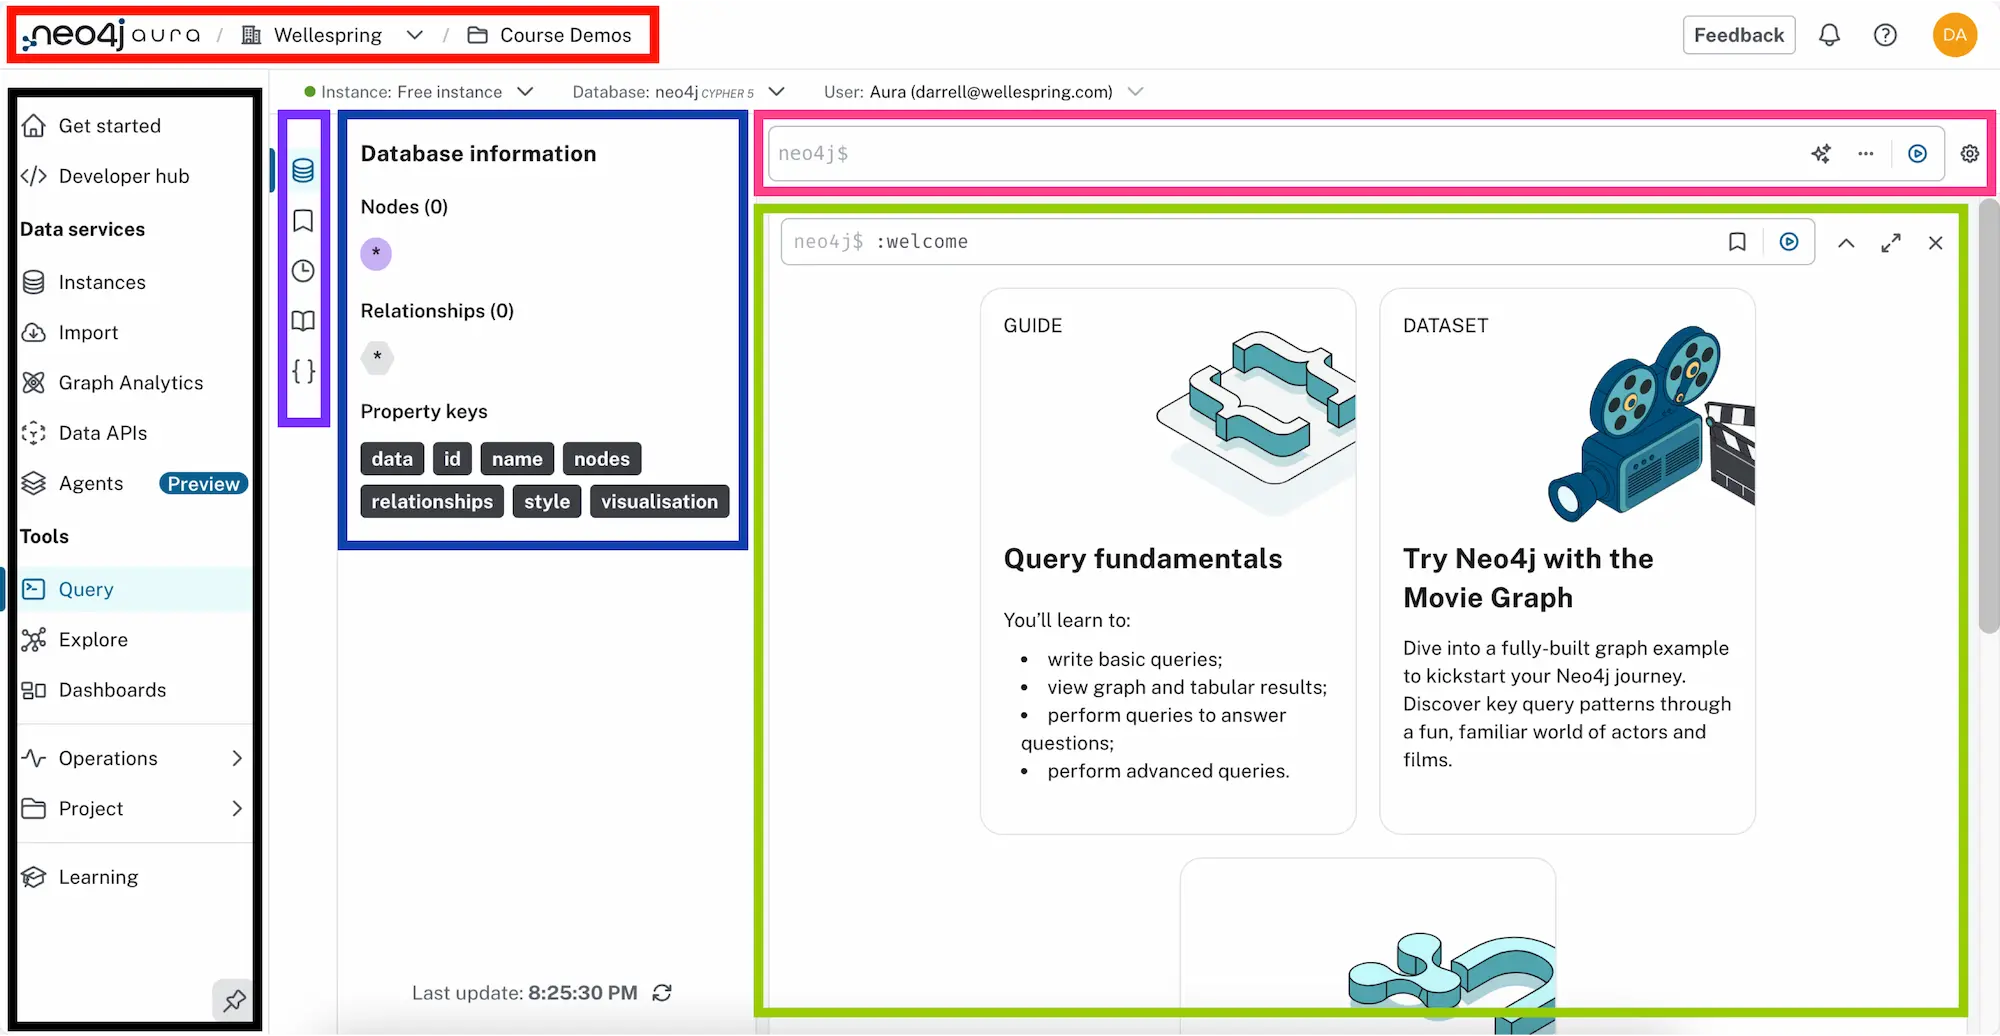
| Area | Description / Purpose | Useful Tip(s) |
|---|---|---|
| Top Navigation | Neo4j Aura logo and Organization/ Project breadcrumb navigation at top of window. |
Allows fast Org/Project switching. |
| Left/Main Nav | Primary Aura Console navigation, giving access to key tools, data services, settings, and learning resources. |
For now, you can safely ignore most sections but the most important are 'Instances,' 'Query,' 'Explore,' and 'Learning.' Click the pin icon to minimize the panel. |
| Query Tool Nav | Exclusive to the Query Tool, this small area provides access to a set of 'drawers' related to database contents, commands, and queries. |
Hover over the icons to see the name of the 'drawer' that each activates. |
| Query Tool Drawer(s) |
Five 'drawer' options, corresponding to the five options in the Query Tool Nav: Database information, Saved Cypher, Query History, Cypher Reference, and Parameters. Each provides specific functionality and/ or information. |
The 'Saved Cypher' & 'Cypher Reference' drawers are extremely helpful, especially for frequent and/or complicated queries. Don't worry about 'Parameters' for now. |
| Cypher Editor | The most important part of the interface, where you enter and run database commands and queries, using Neo4j's 'Cypher' query language. You will use this often. |
Don't be afraid of this. It's really not that complicated. Try it now by typing: RETURN "Hi, Neo4j!"AS greeting; |
| Results Stream | A scrollable list of results from Cypher commands and queries, in reusable frames that can be edited and re-executed. The most recent is always at the top. |
Each result appears as a reusable frame and you can switch each between 'graph,''table,' and 'raw' views. Result frames can be expanded or collapsed. You may remove results one-by-one or you can use the :clear command toremove all of them at once. |
You'll see this image again in our next module, where we'll cover the interface sections in more detail, so don't worry too much if you find it to be a bit confusing for now.
The :welcome command is automatically run each time you launch the Query Tool. This command always presents quick links to Neo4j's latest beginner-oriented learning materials and a short tutorial and prepared dataset that you can use to explore the power of graph databases. These are well worth checking out after you complete this course, or as an interesting set of "side quests" before returning here.
Confirming Your Setup
Let's test that everything works properly. Try this simple command (write it in the Cypher Editor):
RETURN "It works!" AS confirmation;
Then press Ctrl + Enter (Windows) or Command + Enter (MacOS)—or click the ![]() "Run" icon. You should see a new result frame showing a small table with one cell labeled "It works!"
"Run" icon. You should see a new result frame showing a small table with one cell labeled "It works!"
🎉 Congratulations! You're officially running queries/commands in Neo4j!
If you encounter any issues:
- Check your database connection (look for the green dot near the top left). Reconnect to your instance, if necessary. Here's a short video showing how to reconnect to a disconnected instance:
Reconnect to a "disconnected" Neo4j Aura instance.
- Though this is unlikely to be the problem, if your browser blocks pop-ups, allow them on this page (precise procedures will depend on your browser: Chrome instructions, Edge instructions, Firefox instructions, Safari instructions).
- Try refreshing the tab (Windows:
Ctrl + F5; MacOS Safari:Option + Command + Eto clear the cache followed by holding downShiftwhile pressing the reload button; MacOS other browsers:Command + Shift + R). You may need to login to Neo4j Aura again.
What's Happening Behind the Scenes
Every time you run a command in Neo4j:
- The Cypher query you type (e.g.,
RETURN "Hello, Neo4j!") is sent to the Aura cloud database. - The Neo4j server executes it and sends back the result.
- The Aura Console Query Tool displays the result visually.
You can think of this as a conversation:
You: "Find all the songs Jesse Welles wrote."
Neo4j: "Here's the list, and here's how they connect."
Troubleshooting & Tips
- Use Chrome, Edge, or Firefox for best results.
- Avoid Safari on iPad/iPhone: Aura's UI (user interface) can be glitchy on mobile.
- Save your password securely. You may need it for every session, so be sure that you can also find it easily.
- Use a short, descriptive instance/database name. It makes future queries easier to understand.
Key Takeaways
- Neo4j Aura lets you explore Neo4j entirely in the cloud: no installation required. The Free instance offers a generous maximum number of nodes and relationships, sufficient for most personal or small projects.
- Major limitations that you should remember are that Free instances will be paused after 3 days of no activity (requiring manual resuming), instances that are not active for 30 days will be deleted and data cannot be recovered (so be sure to run your instance at least once a month!), and Free instances are not automatically backed up (but you can manually export data and create a snapshot for recovery).
- You now have a running graph database and can access it in the Neo4j Aura Console.
- You can already run simple Cypher commands.
- In the next module, you'll learn more about how to navigate the interface and will start creating your first nodes and relationships: this is where the real fun begins!
Knowledge Check & Reflection
Suggested Readings & Resources
- What is Neo4j? Getting Started with Neo4j.
- What is a Graph Database? Getting Started with Neo4j.
- Neo4j Aura Documentation (Introduction & Quick Start)
- Merki Sasaki, Bryce, and Joy Chao. Graph Databases for Beginners. Neo4j, 2021.
- Robinson, Ian, Jim Webber, and Emil Eifrem. Graph Databases: New Opportunities for Connected Data. Second edition. O’Reilly Media, 2015.